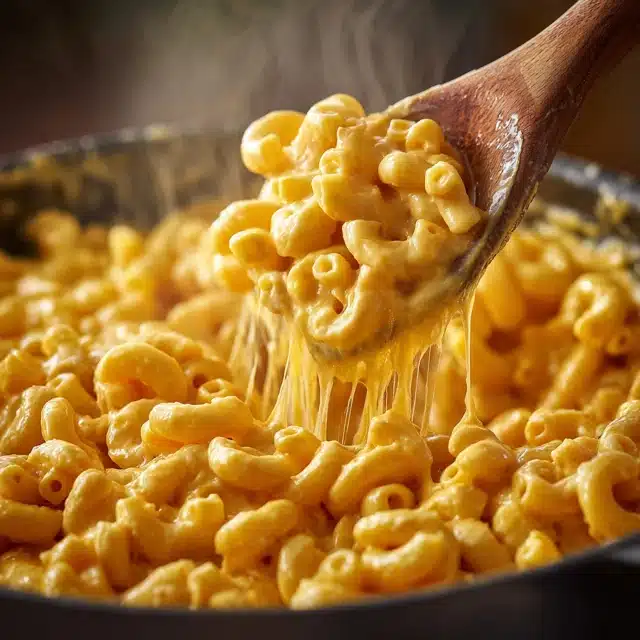
This One Pot Mac and Cheese is a stovetop dream: creamy, cheesy, and ready in under 30 minutes—all made in a single pot with no draining required. Say goodbye to powdered cheese packets and hello to rich, velvety homemade mac that’s just as fast as the boxed kind, but infinitely more satisfying. Whether you’re cooking for kids, weeknight dinner, or craving a cozy bowl of nostalgia, this recipe checks all the boxes.
What Is One Pot Mac and Cheese?
One Pot Mac and Cheese is a simplified stovetop version of the classic comfort food. Unlike traditional methods that boil the pasta separately and require a separate cheese sauce, this version cooks the pasta directly in milk and broth—absorbing the flavor and creating a naturally creamy base.
The result is a luscious, thick sauce that clings to every noodle without needing roux, flour, or complicated steps. It’s faster, cleaner, and honestly—hard to mess up.
Ingredients Overview
Here’s what makes this recipe work, and why each ingredient matters.
Elbow Macaroni
Classic elbow macaroni is the traditional choice for its size, shape, and ability to hold onto the cheese sauce. You can also use shells, rotini, or cavatappi.
Tip: Don’t rinse the pasta—the starch helps thicken the sauce naturally.
Milk
Whole milk is the best choice for richness and creaminess. It forms the base of the sauce as it simmers with the pasta.
Substitutions: 2% works fine, but avoid non-dairy or skim unless you’re adjusting other ingredients to maintain texture.
Chicken or Vegetable Broth
Adding broth along with the milk infuses flavor directly into the pasta as it cooks. It also balances the richness of the cheese and milk.
Tip: Use low-sodium broth to control saltiness.
Butter
Just a bit of butter adds silkiness to the sauce and helps bind everything together. It’s added at the end to keep it bright and rich.
Cheese
Sharp cheddar is the go-to choice, but combining cheeses takes this dish to the next level. Try:
-
Cheddar (sharp or mild)
-
Monterey Jack or Colby Jack (for meltability)
-
Mozzarella (for stretch)
-
Gruyère (for depth)
-
Parmesan (for a salty kick)
Avoid pre-shredded cheese if possible—it contains anti-caking agents that can lead to grainy sauces.
Dijon Mustard
Just a small spoonful enhances the cheesy flavor and adds a subtle tang without making it taste like mustard.
Seasonings
Salt, pepper, garlic powder, and onion powder round out the flavors. Paprika or cayenne can add warmth or spice.
Step-by-Step Instructions
Step 1: Add Pasta, Milk & Broth to Pot
In a large pot or deep skillet, combine:
-
2 cups elbow macaroni
-
2 cups milk
-
1 1/2 cups broth
-
A pinch of salt
Stir and bring to a gentle simmer over medium heat.
Step 2: Simmer Until Tender
Reduce heat slightly and cook, stirring frequently, for 10–12 minutes, until pasta is tender and most of the liquid has been absorbed. Stir often to prevent sticking, especially as the liquid thickens.
Step 3: Add Butter and Seasonings
Once pasta is cooked:
-
Stir in 2 tablespoons butter
-
Add 1/2 teaspoon garlic powder, onion powder, and a small pinch of black pepper
-
Stir in 1 teaspoon Dijon mustard (optional but recommended)
Taste and adjust seasoning.
Step 4: Stir in Cheese
Turn off the heat. Slowly add 2 to 2 1/2 cups shredded cheese, one handful at a time, stirring between additions to melt evenly and avoid clumps.
The residual heat will melt the cheese into a silky, glossy sauce. Add a splash more milk if needed to loosen the consistency.
Step 5: Serve Immediately
Serve hot and creamy, garnished with more shredded cheese, black pepper, or fresh herbs like chives or parsley.
Tips, Variations, and Substitutions
Tips for Creamy Success
-
Use freshly grated cheese for best meltability.
-
Stir frequently as pasta simmers to prevent burning or sticking.
-
Don’t overcook the pasta—it should be just tender when the cheese goes in.
Flavor Variations
-
Spicy Mac: Add a dash of cayenne or a spoonful of hot sauce.
-
Smoky Mac: Use smoked gouda or add a little smoked paprika.
-
Loaded Mac: Stir in cooked bacon, sautéed onions, or roasted broccoli.
-
Truffle Mac: Add a drizzle of truffle oil and grated Parmesan for a gourmet twist.
Substitutions
-
Gluten-free: Use gluten-free pasta and reduce cooking time slightly.
-
Dairy-free: Use unsweetened almond milk and vegan cheese alternatives (results may vary).
-
Lighter version: Use 2% milk and reduce cheese by 1/2 cup.
Serving Ideas & Occasions
This stovetop mac is perfect for:
-
Weeknight dinners with a green salad or roasted vegetables
-
Holiday side dishes alongside turkey or ham
-
Lunchbox favorite: Packs well for next-day lunches
-
Last-minute potluck contributions (doubles easily)
Pair it with:
-
Crispy chicken tenders
-
BBQ pulled pork
-
Sautéed spinach or peas for balance
Nutritional & Health Notes
This recipe provides:
-
Carbs and energy from the pasta
-
Protein and calcium from the cheese and milk
-
Fats for satiety from butter and dairy
To lighten it up:
-
Use whole wheat or high-protein pasta
-
Reduce cheese or use part-skim varieties
-
Add in steamed cauliflower or pureed squash to bulk up the sauce with veggies
It’s a kid-friendly, budget-friendly, and customizable base recipe that’s easy to scale up or down.
Frequently Asked Questions
1. Can I reheat leftovers?
Yes, but stovetop reheating works best. Add a splash of milk and reheat over low heat, stirring gently until creamy again. Microwave reheating is fine in a pinch, but use 50% power to avoid drying it out.
2. Why is my cheese sauce grainy?
Grainy texture usually comes from:
-
Pre-shredded cheese (contains additives)
-
Overheating the cheese
-
Adding cheese too quickly or to boiling liquid
Always turn off the heat before stirring in cheese.
3. Can I make this ahead?
This dish is best fresh, but you can prep the cheese and dry ingredients ahead of time. If reheating, add a splash of milk or broth to loosen the sauce.
4. How do I make it extra cheesy?
Use up to 3 cups of cheese total, mixing varieties like cheddar, Monterey Jack, and Gruyère. Add cheese slowly and taste as you go.
5. What’s the best cheese combo?
Try sharp cheddar + mozzarella for creaminess, or cheddar + Gruyère for nuttiness. Pepper Jack adds spice and meltability.
6. Can I bake this after making it?
Yes! Transfer to a buttered dish, top with breadcrumbs and more cheese, and bake at 400°F for 15–20 minutes until golden.
7. How do I make it creamier?
Add an extra tablespoon of butter or a splash of cream at the end. For ultra-velvety texture, blend in a bit of cream cheese or sour cream before adding the shredded cheese.
Stovetop Mac and Cheese – Quick & Cheesy Comfort Food
This creamy One Pot Mac and Cheese is a quick, cheesy stovetop recipe made in under 30 minutes. No draining, no flour, no fuss—just rich, comforting pasta in a single pot.
- Prep Time: 5 minutes
- Cook Time: 20 minutes
- Total Time: 25 minutes
- Yield: 4 servings 1x
Ingredients
-
2 cups elbow macaroni
-
2 cups whole milk
-
1 1/2 cups low-sodium chicken or vegetable broth
-
2 tablespoons unsalted butter
-
2 1/2 cups shredded cheddar (or cheese blend)
-
1 teaspoon Dijon mustard (optional)
-
1/2 teaspoon garlic powder
-
1/2 teaspoon onion powder
-
Salt and pepper to taste
Instructions
-
In a large pot, combine macaroni, milk, and broth. Bring to a gentle simmer.
-
Cook uncovered, stirring frequently, for 10–12 minutes until pasta is tender.
-
Stir in butter, mustard, garlic powder, onion powder, salt, and pepper.
-
Turn off heat. Add shredded cheese slowly, stirring until melted and smooth.
-
Serve immediately with extra cheese or herbs on top.
Notes
-
For extra richness, add a splash of cream at the end.
-
Use freshly grated cheese to avoid grainy sauce.
-
Add bacon, broccoli, or hot sauce for variations.

